Session
Best Practice
This quick guide walks you through the key steps to set up and run a smooth, collaborative mixed reality session with NOOR.
From device preparation and spatial calibration to lighting setup and asset loading, each section provides essential instructions to ensure a synchronized and immersive experience for all participants.
IMPORTANT
-
Only the first Quest user in a multi-user session has access to “power user” features.
-
Additional Quest users can highlight objects and measure distances using their controllers.
-
Locomotion is synchronized: when activated, all Quest users move together, keeping their relative positions intact.
Check Contents on Devices
Before you start, make sure that all devices joining the session have the content loaded via Droid N-00R.
To ensure all participants see the content, preload scenes on all devices before joining the session. Joining without preloading will result in an empty view.
Calibration
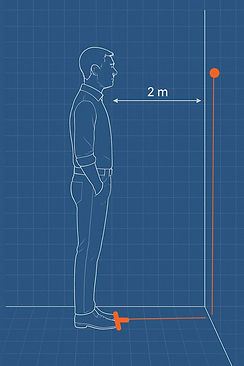
Set a marker on a wall and a marker on the ground two meters away from the wall.
When NOOR has launched a calibration widget will appear, align the orange dot to the marker on the wall and press “Calibrate” pulling the trigger on the controller.
Ensure each participant stands at the same marked spot on the floor and repeat this process for everyone.
Note: in a single user session calibration is not that important, but it' always a good practice to do it correctly.
Lighting
By default NOOR start with no lights (this will cause black controllers appearance)
Access the VR user interface and choose a "lighting scenario" from the "Scenes" menu, or request the operator to set one for you.
Note: If your scene already includes lights or lighting scenarios, this step is unnecessary.
Loading a lighting scenario may take a few seconds.
Load Scenes
After preloading scenes via Droid N-00R, access them through the VR UI. Select your desired scene(s); Noor allows for loading multiple scenes.
Spawn Assets
NOOR includes preloaded generic assets for reference.
To visualize your own assets as spawnable options in the Assets menu (below the defaults), adhere to the naming conventions outlined in the "Asset Creation Best Practice" guide.
Layers & Animation
NOOR supports layers and animation files.
Refer to the "Asset Creation Best Practice" guide for specific creation instructions. Once correctly created, these assets will be accessible in their respective menus.
Note: visual and text helpers should appear above controllers for guidance. If unsure, always check your controllers.